Showing posts with label Bento. Show all posts

Tuesday, October 25, 2011

Tutorial Cheese Crackers Real or Fake ?

Today's tutorial is a funny one, are these cheese crackers real or fake? This is an easy tutorial which we can use as a bento space filler, or as a funny prank, or as a party snack or even something less scary for Halloween. I think the possibilities are endless and this is going to taste great with breads, sandwiches, chips, salads, etc :D

Here's what you need:
2 slices of cheddar cheese
1 slice of goat cheese (or young cheese, or any cheese that is lighter than the 2 slices of cheddar you have)
1 circular cookie cutter with scallop edge (you can also use flower shaped cookie cutters)


Here's what I did:
1. Stack the cheese slices on top of one another in this manner:
cheddar cheese - goat cheese - cheddar cheese

2. Use the cookie cutter to make the shapes. Then use a toothpick (or the end of a food pick) and poke 9 holes in the centre. Voila!!

Bento Filler: Cheese Crackers Real or Fake ?

This is also a fun and easy project to work with kids because its relatively easy and mess-free for the adults and its also easy enough for kids to grasp the instructions. So now the question is, how would you name this bento tutorial, Fake Cheese Crackers or Real Cheese Crackers? ;D

Monday, October 24, 2011

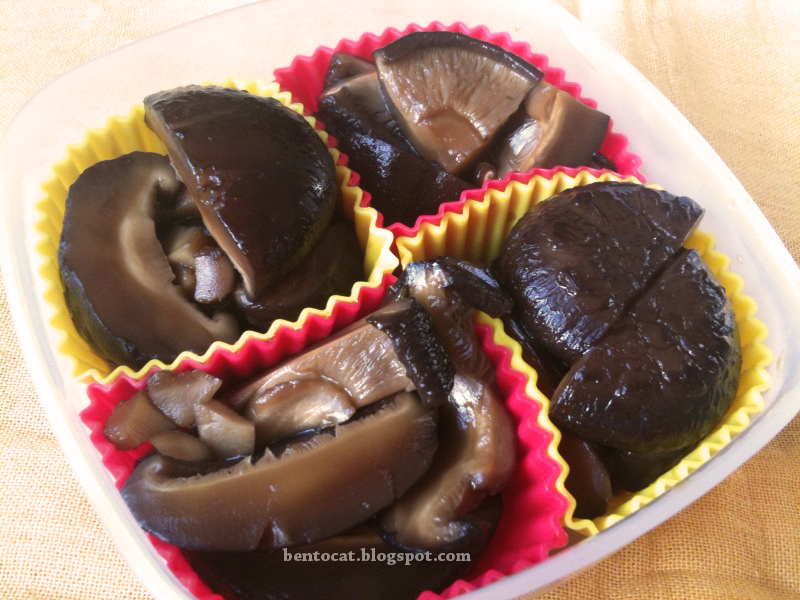
Tutorial Sweet Simmered Shiitake Bento Timesaver

Today's tutorial post is about another trick I have up my sleeve, sweet and simmered shiitake mushrooms, which is essentially a bento timesaver recipe. This is a perfect recipe if you know that you will be busy for the rest of the week and have no time to prepare every item individually in mornings. If stored well in the refridgerator, this sweet and simmered shiitake mushroom bento timesaver should last up to a week.

Sweet and Simmered Shiitake - Bento Time Saver and Space Filler


Ingredients:
10 dried shiitake mushrooms
3 tablespoons soy sauce
2 tablespoons sugar
2 tablespoons mirin (dry sherry can be used as a substitute)

How to:
1. Soak the dried shiitake in cold water until soft. This takes about 1 hour. 

Tip: Usually I'll soak the mushrooms while I'm preparing dinner. By the time Mr Bear and I have finished eating dinner and finished all the cleaning up, it will all be soft enough. If you like, you can soak the mushrooms overnight as well.

How I soak dried mushrooms

Tip: This picture shows how I soak the mushrooms. Because the dried shiitake mushrooms tend to float (which I find rather annoying), I used a dipping dish as a weight so that all mushrooms will get soaked evenly. 

Do not discard the water which you used to soak the mushrooms.

Once the shiitake mushrooms are soft, remove the stems and cut them into bite size pieces.

Tip: As shown in the very first photo, I have cut them into different shapes. This is a personal preference because I figured that if this sweet and swimmered shiitake timesaver is going to appear on me and Mr Bear's bento for the next 2 days, it might be more interesting if they don't look the same everytime we open up the bento.

2. Put the shiitake in a pot with enough soaking water. Bring to a boil, then reduce heat and add all the other ingredients. Continue simmering until the liquid is almost absorbed completely.

Let it cool completely and portion it into little containers or small silicon cake molds. Store in the refridgerator.

This shiitake bento timesaver might taste a little sweet on it's own because it is designed as a side dish to go with rice. If you like you can serve it together with a plain salad as well.

This is how I make the Sweet and Simmered Shiitake Bento Timesaver, I hope you find the recipe and tips helpful too.

Saturday, October 22, 2011

Bento Burrito with Usagi Food Picks

Today's bento post features burrito and some of my favourite bento accessories, the Usagi Food Picks. This bento was made a few days back when I still have some of the carrot kinpira bento time saver left. As for the 4 mini burrito, it was made from 1 large burrito sheet cut into quarters and then rolled up individually to fit the bento box. I have included the usagi food picks (usagi means rabbit in japanese) so that I don't have to pack extra utensils for the carrot and cucumber. This means less washing up to do ^^," I hope you like this burrito bento too!

Bento Burrito with Usagi Picks

Friday, October 21, 2011

News my bentos got published in Dutch magazine

Some of you might have known that I got interviewed for a Dutch magazine some time back. Today I walked past a newsstand and saw that the article has been finally published! This article can be found in a pretty interesting Dutch magazine called Jansen, Oktober/November 2011 issue. There was an article written about the whole bento subculture travelling from Japan to the United States and Netherlands and all over the world. Bentocat was featured extensively in the article together with another Dutch bento enthusiast Leukelunch. Today is indeed a lucky Friday for me :)


Tuesday, October 11, 2011

Tutorial Bento Time Saver Carrot Kinpira Meatfree

Today I will share with you how I make a bento space filler that also happens to be a bento time saver, my own Carrot Kinpira. Many people have asked me recently, how on earth do you find time to make all these bentos. Well, let's say that making bentos does take a bit of effort. BUT sometimes I do get lazy, that's why I have to devise ways and means to make things more efficient. hehehe!

Kinpira 金平 きんぴら is a japanese style of cooking that can be roughly translated as "sauté and simmer". This technique can be used with many different types of root vegetable, such as carrot, burdock and lotus root. Sometimes the kinpira technique is also used on other foods such as tofu, wheat gluten and also meats like chicken, pork and beef. So in a way, I guess you can also call it Japanese stir-fry.


Carrot Kinpira Bento Time saver and Bento Filler
Ingredients
Half a carrot (julienne into strips about the size of matchsticks)
1 tablespoon Sugar
1 tablespoon Mirin
1 tablespoon Soy sauce
1 teaspoon of sesame oil
Dash of ketchup (you'll be surprise what this can do)
Sesame seed (optional)


Here's what I usually do


Carrot Kinpira - Julienne carrot


Carrot Kinpira - heat the sesame oil


Heat the sesame oil in a frying pan for less than 1 minute over moderate fire. Take care that the temperature does not get too hot, else the sesame oil will burn a little and it will taste bitter.


Carrot Kinpira - Quick saute and simmer


Add in the carrot strips and quickly toss it around a few times to make sure that they get evenly coated with the sesame oil.

Add in the sugar and give it a quick toss. If you like you can wait a little for the sugar and the sugar to caramalize a little.

Next add in the mirin and toss. At this stage, I will also add in a dash of ketchup. You will be surprised that an American invention such as the ketchup has made its way to a normal japanese kitchen (think omurice and spagetti Napolitan). The reason why I like to use a bit of ketchup here is that the tartness (sour-ness) of the vinegar and the tomato puree in the ketchup actually gives another dimension to the otherwise just sweet taste of the dish and it makes the carrot look good too!

Finally, I add in the soy sauce. I always add soy sauce the last because overcooking soy sauce changes the chemical content and also the taste of the soy sauce. Give it a quick stir and sprinkle a few sesame seeds and you are done!

This carrot kinpira recipe gives me about 4 side portions. I portion them out and place them all in a couple of silicon cake molds. This can be stored in the refridgerator for a few days and it means that everytime I want to make a bento with it, I can just take whatever I need and place it in the bento immediately. This is also great on the days when I run out of bento ideas and makes a great bento space filler too. I hope you like this bento time saver tutorial the meatfree Carrot Kinpira.


Award: Heart Locket Award

Although fall is coming (or should I say, it's already here ^^,) and the sky is slightly grey, it's been a very nice day today.  I woke up later than usual, switched on my computer  like usual (don't we all do that in mornings nowadays? hehehe) and to my surprise I found that one of my blogger friends gave me a Heart Locket Award, which I think is so sweet of her. She is Tata from Bonitofood.
 
Thank you so much Tata for being so nice and sweet, you really make my day :D


These are some rules for the award receiver:
1. If you get this award, pass it on to other 7 blogs
2. Put in the award picture in your post
3. Don't pass the award back to the award giver
4. Answer the questions below and post them in your blog

Only 2 questions, it's good to know you better :D
1. What makes you feel great about yourself?
2. Who inspires you most? Also be more specific, which qualities inspire you, in each person? You can list as many people you like.

My answers:
1. Bento making really make me feel great about myself. I've been asked before, why bother to go through so much trouble, when the food is going to be eaten up in 3 seconds anyway. This is really a good question though. The thing about me is my gratification doesn't actually come from the bento receiver slowly savouring the food. On the contrary, it comes from me knowing that my bento has cheered someone up from a boring/busy workday and the rest are totally not important for me. haha, I guess in a twisted sense, its the fascination (that my bentos make other people happy) that makes me feel great about myself. hehe

2. Well, I guess it has to be my husband Mr Bear. Usually I don't go all mushy about us and such, but I think he really deserves a mention. I think he is the most intelligent and sensitive guy I have ever met. I used to be a die-hard feminist and never really believed much in stuff like cooking for my man. When I got to know Mr Bear, everything changed, my world changed, the way I view the world changed as well. He was the one who gave me the strength and encouragement to really do what I like without being judgemental. Thank you for being you Mr Bear.

Now let me pass this award to 7 lucky beautiful blogs:
 
5. hwsoh

Have a Happy Day!

Monday, October 3, 2011

Bento Making Golden Rules

I was looking back at my old bentos over the weekend and felt rather happy seeing my progress. I realised that I have learnt a few lessons over the course of time. Here are some of the "Golden Rules" I have learnt.

Golden Rules of Bento Making (c)iStockphoto/Ayzek

Golden Rule #1
Always stuff your bento lunch box till it's full. 

When I say full, I really mean full, to the top edge of the box. Usually I make sure it's so full that there is no room for the ingredients in the box to move around.

I remembered the time when I thought I had made a decent bento in the morning and when I opened it for lunch, to my horror, it was a terrible mess. Apparently the contents moved everywhere because I had only filled the base of the box with items and they had moved around in that big space above them as I made my way to school.

Golden Rule #2
Make sure that food is sufficiently cooled before you place them in the box.

This is because condensation may occur and it may spoil the items in the box prematurely.


Golden Rule #3
Try to line the bento box with some kind of leafy vegetable makes cleaning up a lot easier.

Of course, this isn't compulsory, but it really does make a difference when it comes to cleaning up. And besides, the lettuce can always be eaten up so there's hardly any wastage.

Golden Rule #4
Keep salad dressings / sauce dips in a separate tiny container.

This prevents the salad turning into a soggy mess by lunchtime. When the weather is warm, I use a small cooler pack on the vegetables as well.

Golden Rule #5
Pack a small cooler pack with the bento if the weather is warm


This keeps the food fresher and prevents sad looking half melted cheese.


So far these are some of the golden rules I always store at the back of my head whenever I make bentos. More "golden rules" (or I would rather say tips and tricks) of bento making coming up soon, so do keep an eye on the site :)


Sunday, October 2, 2011

Bento Elf Babies - Inari Sushi - Meat-free

These two elf babies are essentially Inari sushis, simply tofu pouches and rice balls.
I made this Bento Elf Babies with some leftover tofu pouches from the Ninja Bento I made for Mr Bear on Friday. Even though I am carnivourous (most of the time), I really will eat meals without meat if its delicious and presented in an appealing way. I guess you can say that I am a big kid in disguise. hahaha!

Bento Elf Babies Inari sushi, shown here with 2 black Ojue compartments
Hope you like this Meat-free Inari sushi Elf Baby Bento!

Friday, September 23, 2011

Bento Tricolour Pesto Pasta

Today's bento is a tricolour bento made with bow-tie pasta (also known as Farfalle) laced with pesto sauce. I added red capsicum and golden yellow zucchini for the extra colour and taste.

Tricolour bento with Pesto Farfalle Capsicum and Golden Zuccini
The golden yellow zucchini and the red capsicum were prepared together with the farfalle pasta and pesto sauce as one-dish. When I was packing this tricolour bento, I set aside the red capsicum and yellow zucchini so that it looks bright and colourful. Have a bright and colourful Friday too and I hope you like this tricolour pesto pasta bento!

Wednesday, September 14, 2011

Bento Easy Transportation Vehicles

Today's bento is another quick and easy one. The school term has just started and I'm still trying to manage the new school schedule. For this bento, I used a Daiso sandwich cutter with 4 transportation vehicles joined together. If you are thinking whether you should buy it, here's a review which I had written sometime back in August.

First I placed some lettuce at the base of the box (which also makes cleaning up a whole lot easier). Next I buttered 2 slices of bread and lay a piece of cheese right on top of both slices of bread. I could have also placed the cheese between the bread, but chose not to do so. This is because:
#1 I think it looks brighter with the yellow cheese on top.
#2 the cheese makes it easier to stick the nori pieces on the little vehicles

Finally I threw in some olives and a piece of sundried tomato in the remaining spaces.

Bento Easy Transportation Vehicles
Hope you like this easy transportation vehicles bento! :)

Tuesday, September 13, 2011

Bento Cheese Salami Sandwich Rollup cucumber flowers

Today I woke up feeling a bit "dry" for bento ideas. Yes, sometimes stuff like this happens. I think isn't necessarily a bad thing because it shows that I'm still human after all :D So the very first thing I usually do in this situation is to open the fridge door and stare hard at everything sitting on the shelves. I saw half a cucumber, 1/4 slice (Not even half a slice -_-") of young cheese, half slice of salami. So this is what came out of these leftovers.


Bento Cheese Salami Sandwich Rollup and cucumber flowers
The bento box is an airtight food storage box which I got from the Hema store and it comes in a set of 2. I like it very much because it has an easy size and shape to work with. As for the star shape, I used a set of star-shaped cookie cutters from Daiso.

I hope you like this Bento Cheese Salami Sandwich Rollup with cucumber flowers (oh yes, and those two little white/blue packages are chewy candies)

Wednesday, September 7, 2011

Bento Healthy Grapefruit Bunnies Salad

After binge-eating with Mr Bear last night, I woke up feeling like I had a food hangover. So I decided to go super healthy with this salad bento : Grapefruit Bunny Bento with lettuce. Detox!

First I put a few layers of lettuce and then the grapefruit. Not only does the lettuce looks pretty with the grapefruit, I've discovered by chance that the lettuce have an extra function. The lettuce layers "lift" the juicy bits of the grapefruit and I got to enjoy the texture of the grapefruit without them swimming in the juice. So I get to eat the grapefruit, then the lettuce and finally slurp up all the remaining juice that had collected at the bottom. What a nice discovery!

Healthy Meat-free bento featuring Grapefruit Bunnies

Close up of bento Grapefruit Bunnies

I used 2 large pieces of lettuce and 1 whole grapefruit. Just like the honeydew bunnies, I used the seed as eyes for the Grapefruit Bunnies. The bento box I used here is a 200ml air tight box I bought from Hema. Hope you like this healthy meat-free bento salad : Bento Grapefruit Bunnies :D

Thursday, September 1, 2011

Bento Sandwich Naked Baby Salami Star

Its been a long time since I made bentos that doesn't require any cooking. Today I have decided to wake up at 0700hr to make what I call a Cook-Free bento for Mr Bear.

Bento Sandwich Salami Star and Naked Cheese Baby
Close up : Bento Naked Cheese Baby and Salami Star

This is what I did while Mr Bear was getting ready to work:

- Cut of the crust of bread.
- Spread butter on 1 side of bread and lay the cheese and salami.
- Cut the bread neatly into half and squeeze them into the bento box.
- Add the salami star and cheese baby which I had prepared last night.
- Fill up the rest of the bentos with fresh strawberries.
- @ 0715hr BENTO FINISHED!

For this Naked Baby Sandwich Bento, I had used a black bento box from Daiso. I guess its meant for  men because of some funny words printed on the lid. It says, "THE KING OF KINGS the king wore a crown. he is the king of kings" :D :D :D I bought both sizes and this is the larger one.

For the cheese, I chose to use sliced young Dutch Gouda cheese ( Goudse kaas - Jong belegen) instead of the usual cheddar cheese because Mr Bear doesn't like cheddar and also because it doesn't go all floppy so soon. For the nori bits, I used a nori punch for the mouth and the leaf piece. The leaf shaped nori punch I had does not have the jagged edges, so I add them in myself. This is how I made this Naked Baby Salami Star Sandwich Bento. Hope you like it!

Monday, August 29, 2011

Bento Honeydew Bunnies Mapo Tofu Tutorial

Yesterday, I have written a post on one of the bentos I made some time back but forgot to mention here. This is a step-by-step tutorial on how I arrange the Bento. Enjoy!


Bento Mapo Tofu with Honeydew Bunnies and Nectarine

Step 1: Mold the rice into some sort of semi-circle. I used an ordinary rice paddle here.
Cat Face Bento Step 1

Step 2: Fry the tofu with Mapo paste and fry the omelette in a seperate pan if possible.
Stir-fry the tofu in Mapo paste

Step 3: Place the omelette around the rice and pour in the tofu mixture into the rest of the space.
Add in a few pieces of nori seaweed and viola!
Cat Face Bento Mapo Tofu with Omelette
--------------------------------------------------------------------------------------------------------------------

Since I know that I'll be adding in the top tier of the bento box, I did an additional step. I felt as though I was a little neurotic doing it, but I guess I was just lazy and didn't want to do so much cleaning around the bottom groves of the upper tier.

Pressing the Bento with a piece of Gladwrap underneath

This is how I made the Cat Face bento with simple ingredients like rice, tofu and omelette. Hope you like it!

Sunday, August 28, 2011

Bento Honeydew Bunnies Mapo Tofu

Over the next few days, I will be featuring some of the bento's I have made before but forgot to mention here in Adventures of Bento Cat. Today's Past Bento is Mapo Tofu with Honeydew Bunnies and slices of Nectarine. I had made this shortly after I came back from my summer vacation and accidental Bento equipment haul (^^,)

Bento Mapo Tofu with Omelette
This photo above shows the bottom layer of Bento Mapo Tofu. The egg omelette serves an aesthetic purpose and also acts as a edible seperator (baran). This prevents the rice from soaking up too much of the liquid from the spicy Tofu. Honeydew Bunnies and sliced nectarines are stored on the upper deck of the bento box.

Bento Honeydew Bunnies with sliced Nectarine

Tomorrow I'll write a post on a step by step tutorial on how I made Bento Honeydew Bunnies Mapo Tofu! So Stay Tuned!

Thursday, August 25, 2011

DIY bento accessories - rice and pasta mold - flower

Last week, I wrote a post on how to make your own leaf shaped and heart shaped bento accessories. This time round I will show you how I make my own flower shaped rice mold out of the remaining plastic "bottle". Simply cut the end of the bottle according to the desired height.


This can also be used for certain types of pasta. As long as you work fast and the rice is not too hot for your hands, you can just pack the rice into the mold and pop it out just like how you make sandcastles.

For a more detailed write up on tools and basic steps on how to DIY bento accessories, you can check this out. 

Wednesday, August 24, 2011

Bento Mushroom with Jus and Cod Roe Sprinkles

This is a bento with some quick and easy left overs from the dinner the night before. I sliced some mushroom and gave them a quick stir fry with the meat sauce from the previous night. Then I pack in the rice and sprinkle some Tarako Furikake, which is a Japanese Sprinkle made from Cod Roe. I had used a plastic strip cut from a soda bottle as a sort of stencil for the Japanese Sprinkle. My only mistake was that I pushed the strip too far into the rice and it looked a little messier than what I had in mind. If you are trying this out with the round strip from the soda bottle, try to make sure that you have about 2cm of it sticking out above the rice. Try to pour the sprinkle from as close to the surface of the rice as possible, it helps!

Bento with Mushroom and Tarako Furikake

Tuesday, August 23, 2011

Bento Singapore Chicken Curry Amsterdam - Cook a Pot of Curry Day

As a finale for the now famous facebook event Cook a Pot of Curry Day in Singapore (you can read more here), I made a bento with the rest of the chicken curry I cooked on Sunday 21 August. As with many types of curry around the South East Asia regions, this dish taste even better on the second day. Here is my take on a very Asian dish in a very Amsterdam setting. The roof, big open windows and not forgetting the typical Amsterdammetjes were made from nori seaweed.

Amsterdammetjes (Literal translation: little one from Amsterdam) in real life are little red-brown poles that can be found along sidewalks of Amsterdam. All of them bear the sign XXX, which is the coat of arms of Amsterdam. Interestingly, there is never a really straight Amsterdammetje, they are always slanting someway or another, sometimes to the left, sometimes to the right, sometimes with a dent here and there, which I like, because I think each of them tells a story.

The same goes for the buildings, especially the older buildings along the canals. I think this has got to do with the soft soil foundation under the buildings. My apartment is also severely slanted. But I really don't mind it nowadays (after taking out the wheels from the computer chair, that is. hahahaha!)

Singapore Chicken Curry Bento from Amsterdam

Cook a Pot of Curry from Singapore to Amsterdam

So this is my take on the Cook a Pot of Curry event which was created to promote harmony, respect and tolerance for each other's culture. Oh yes, and in case you are wondering where's the chicken in this Chicken Curry Bento.... there is only 1 little piece left tucked under all the potatoes and the rest of the chicken was already eaten up because I couldn't resist it :D

Saturday, August 20, 2011

Bento Nasi Lemak recipe- Coconut Rice , Omelette & strawberries

I'm pretty excited. Tomorrow is going to be the Cook a pot of Curry day in Singapore! More than 50000 people are going to cook curry dishes for the event. Yesterday, I have written a post on Devil's Curry and today I am going to post something that's less spicy. Bento Nasi Lemak paired with cucumber and strawberries!

Bento Nasi Lemak

Here's what I put into the rice cooker:
(serves 3, I saved a portion rice for this bento and had the rest for dinner with Mr Bear)
3 cups rice
1 small packet of coconut cream (aka Santan, available in most supermarkets)
water
pinch of salt

While the rice is cooking, I sliced the cucumber, fried the chicken, omelette and dried anchovies and there you go! Nasi Lemak Bento with Coconut Rice with Egg omelette, chicken, cucumber, dried anchovies and strawberries.


Wednesday, August 17, 2011

Bento Slavink, Potato Croquette and Green Apple

Today's bento is Slavink, Potato Croquette and a Green Apple.
Let me talk a little about Slavink today. It's a traditional Dutch meat dish that I happen to like. It's made with mince meat, which is then wrapped around with bacon (which is not pre-smoked) and then baked or pan fried. Usually it can be found at the local butchers and big supermarket in the Netherlands. Mr Bear says it's an Albert Heijn thing because he didn't see Slavink being sold anywhere else other than Albert Heijn when he was a kid. Hmm but I really think its a local butcher thing because so many Dutch Deli meats can be found there and I swear I saw a couple of them sitting next to the sausages in the neighbourhood butcher!

Store bought Slavink is pretty easy to cook, just throw it onto the pan or in the oven, and wait for it to cook. Usually it is combined with potatoes and vegatables for a balanced meal. Since there is a random green apple sitting in the fridge, I decided to use it in this bento box as well.
 

About Bento Cat

My photo
Amsterdam, Netherlands
I'm Shanna and I enjoy bento making a lot. I'm also a wife, daughter,sister,a full-time student, previous fashion and product designer, nerd and super foodie all rolled into one. With Adventures of Bento Cat, I hope to document the daily happenings of my life through Bentos filled with Tender Loving Care and more! I can be contacted at bentokato@gmail.com
Related Posts Plugin for WordPress, Blogger...
Creative Commons License
Blog by Shanna at Bentocat.blogspot.com is licensed under a Creative Commons Attribution-NonCommercial-NoDerivs 3.0 Unported License.