Showing posts with label bento space filler. Show all posts

Tuesday, October 25, 2011

Tutorial Cheese Crackers Real or Fake ?

Today's tutorial is a funny one, are these cheese crackers real or fake? This is an easy tutorial which we can use as a bento space filler, or as a funny prank, or as a party snack or even something less scary for Halloween. I think the possibilities are endless and this is going to taste great with breads, sandwiches, chips, salads, etc :D

Here's what you need:
2 slices of cheddar cheese
1 slice of goat cheese (or young cheese, or any cheese that is lighter than the 2 slices of cheddar you have)
1 circular cookie cutter with scallop edge (you can also use flower shaped cookie cutters)


Here's what I did:
1. Stack the cheese slices on top of one another in this manner:
cheddar cheese - goat cheese - cheddar cheese

2. Use the cookie cutter to make the shapes. Then use a toothpick (or the end of a food pick) and poke 9 holes in the centre. Voila!!

Bento Filler: Cheese Crackers Real or Fake ?

This is also a fun and easy project to work with kids because its relatively easy and mess-free for the adults and its also easy enough for kids to grasp the instructions. So now the question is, how would you name this bento tutorial, Fake Cheese Crackers or Real Cheese Crackers? ;D

Monday, October 24, 2011

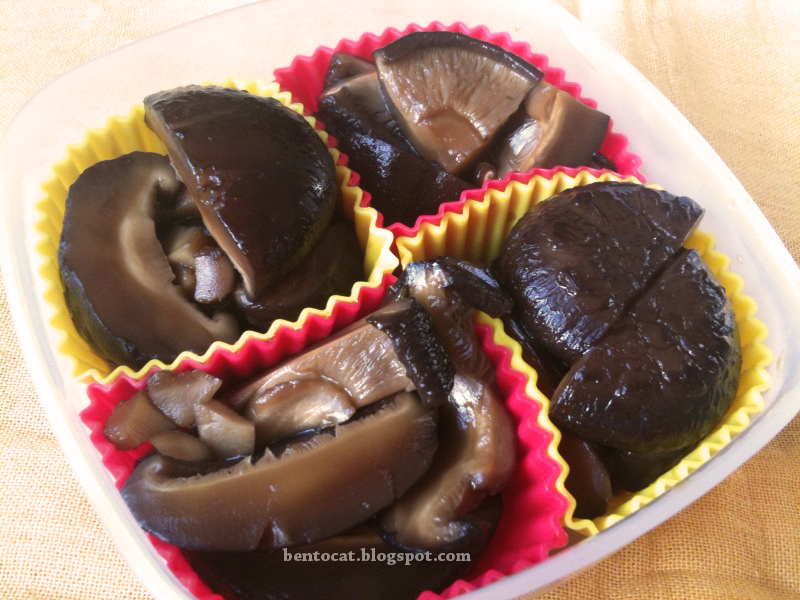
Tutorial Sweet Simmered Shiitake Bento Timesaver

Today's tutorial post is about another trick I have up my sleeve, sweet and simmered shiitake mushrooms, which is essentially a bento timesaver recipe. This is a perfect recipe if you know that you will be busy for the rest of the week and have no time to prepare every item individually in mornings. If stored well in the refridgerator, this sweet and simmered shiitake mushroom bento timesaver should last up to a week.

Sweet and Simmered Shiitake - Bento Time Saver and Space Filler


Ingredients:
10 dried shiitake mushrooms
3 tablespoons soy sauce
2 tablespoons sugar
2 tablespoons mirin (dry sherry can be used as a substitute)

How to:
1. Soak the dried shiitake in cold water until soft. This takes about 1 hour. 

Tip: Usually I'll soak the mushrooms while I'm preparing dinner. By the time Mr Bear and I have finished eating dinner and finished all the cleaning up, it will all be soft enough. If you like, you can soak the mushrooms overnight as well.

How I soak dried mushrooms

Tip: This picture shows how I soak the mushrooms. Because the dried shiitake mushrooms tend to float (which I find rather annoying), I used a dipping dish as a weight so that all mushrooms will get soaked evenly. 

Do not discard the water which you used to soak the mushrooms.

Once the shiitake mushrooms are soft, remove the stems and cut them into bite size pieces.

Tip: As shown in the very first photo, I have cut them into different shapes. This is a personal preference because I figured that if this sweet and swimmered shiitake timesaver is going to appear on me and Mr Bear's bento for the next 2 days, it might be more interesting if they don't look the same everytime we open up the bento.

2. Put the shiitake in a pot with enough soaking water. Bring to a boil, then reduce heat and add all the other ingredients. Continue simmering until the liquid is almost absorbed completely.

Let it cool completely and portion it into little containers or small silicon cake molds. Store in the refridgerator.

This shiitake bento timesaver might taste a little sweet on it's own because it is designed as a side dish to go with rice. If you like you can serve it together with a plain salad as well.

This is how I make the Sweet and Simmered Shiitake Bento Timesaver, I hope you find the recipe and tips helpful too.

Saturday, October 22, 2011

Bento Burrito with Usagi Food Picks

Today's bento post features burrito and some of my favourite bento accessories, the Usagi Food Picks. This bento was made a few days back when I still have some of the carrot kinpira bento time saver left. As for the 4 mini burrito, it was made from 1 large burrito sheet cut into quarters and then rolled up individually to fit the bento box. I have included the usagi food picks (usagi means rabbit in japanese) so that I don't have to pack extra utensils for the carrot and cucumber. This means less washing up to do ^^," I hope you like this burrito bento too!

Bento Burrito with Usagi Picks

Thursday, October 13, 2011

Tutorial Thursday Bento Uncle Samosa

Yesterday Mr Bear and I had an Indian home delivery for dinner. The portions were surprisingly big and there was quite a lot of left overs. There was a big samosa that we couldn't finish and so I decided to make a tutorial on how I bento-fy (is there even such a word?) something as challenging as a irregularly shaped Samosa.

Bento Uncle Samosa

Because the samosa does not really have a smooth surface and I was feeling lazy, I decided to put the decorations on the OUTSIDE instead of directly on the samosa.

What I did was to just wrap the samosa in saran wrap (aka glad wrap, food wrap). Next I fill up the rest of the space with cucumber and tomato. I didn't use any dividers in this bento because the saran wrap would already prevent the samosa from coming in direct contact with the cucumber and tomato. As a final touch I just use a marker to draw in the eyes on contruction paper and stick it on. Uncle Samosa's moustache is made from a brown piece of contruction paper, so I didn't have to do any colouring myself. hehe.

If there is stickers lying around in the house, it will be even easier. You just have to draw in the eyes and stick it on the saran wrap.

Hope you like this easy time-saving tutorial and have a good laugh at silly Uncle Samosa!

Tuesday, October 11, 2011

Tutorial Bento Time Saver Carrot Kinpira Meatfree

Today I will share with you how I make a bento space filler that also happens to be a bento time saver, my own Carrot Kinpira. Many people have asked me recently, how on earth do you find time to make all these bentos. Well, let's say that making bentos does take a bit of effort. BUT sometimes I do get lazy, that's why I have to devise ways and means to make things more efficient. hehehe!

Kinpira 金平 きんぴら is a japanese style of cooking that can be roughly translated as "sauté and simmer". This technique can be used with many different types of root vegetable, such as carrot, burdock and lotus root. Sometimes the kinpira technique is also used on other foods such as tofu, wheat gluten and also meats like chicken, pork and beef. So in a way, I guess you can also call it Japanese stir-fry.


Carrot Kinpira Bento Time saver and Bento Filler
Ingredients
Half a carrot (julienne into strips about the size of matchsticks)
1 tablespoon Sugar
1 tablespoon Mirin
1 tablespoon Soy sauce
1 teaspoon of sesame oil
Dash of ketchup (you'll be surprise what this can do)
Sesame seed (optional)


Here's what I usually do


Carrot Kinpira - Julienne carrot


Carrot Kinpira - heat the sesame oil


Heat the sesame oil in a frying pan for less than 1 minute over moderate fire. Take care that the temperature does not get too hot, else the sesame oil will burn a little and it will taste bitter.


Carrot Kinpira - Quick saute and simmer


Add in the carrot strips and quickly toss it around a few times to make sure that they get evenly coated with the sesame oil.

Add in the sugar and give it a quick toss. If you like you can wait a little for the sugar and the sugar to caramalize a little.

Next add in the mirin and toss. At this stage, I will also add in a dash of ketchup. You will be surprised that an American invention such as the ketchup has made its way to a normal japanese kitchen (think omurice and spagetti Napolitan). The reason why I like to use a bit of ketchup here is that the tartness (sour-ness) of the vinegar and the tomato puree in the ketchup actually gives another dimension to the otherwise just sweet taste of the dish and it makes the carrot look good too!

Finally, I add in the soy sauce. I always add soy sauce the last because overcooking soy sauce changes the chemical content and also the taste of the soy sauce. Give it a quick stir and sprinkle a few sesame seeds and you are done!

This carrot kinpira recipe gives me about 4 side portions. I portion them out and place them all in a couple of silicon cake molds. This can be stored in the refridgerator for a few days and it means that everytime I want to make a bento with it, I can just take whatever I need and place it in the bento immediately. This is also great on the days when I run out of bento ideas and makes a great bento space filler too. I hope you like this bento time saver tutorial the meatfree Carrot Kinpira.


Wednesday, October 5, 2011

Bento Inari Hairclip Bears

Today's bento post Inari Bears with Hairclips, is consist of Inari sushi, which is simply made of rice stuffed into tofu pouches, and some cucumber on the side. Sometimes I add cream tuna or corn into the pouch too, but this time  its plain.  I didn't take long to prepare this bento, because its just stuffing the rice into the pouches and slicing cucumbers. Later on I just stick foodpicks (which I bought recently from Bento&Co) near the corners to form ears for the bears. They also look like hairclips for the inari bears. So far this has been my favourite set of food picks because it's quite funny.

Bento Bears with hairclips which are funny looking foodpicks I ordered from Bento&Co

If you see the picture above, they looked like butterfly and clover "hairclips" but there's more to it than meets the eye. Here's how the funny foodpicks look like from the side:
Funny Bento Foodpicks 1 - sideview

Funny Bento Foodpicks 2 - sideview


Hehe, I think this picks will come in handy for cherry tomatoes, little quail eggs or grapes. Using food picks means that dirty fingers will not come in contact with the tomatoes, quail eggs or grapes and it instantly adds some colour to a bento.

Friday, September 30, 2011

Bento Ninja Friday Funny - Meatfree

Funny Friday Meatfree Bento Ninja. Its Friday again and today's bento post is about 2 funny ninjas. These 2 funny ninjas are actually inari sushis in disguise. They are made with tofu skin pouches (abura-age) and rice. Since Mr Bear also like to have inari sushi with corn, I placed some corn in a small silicon baking mold as a spacefiller for the bento. Chopped green apples are also included as a healthy dessert.


Friday Funny Bento Ninja

I hope you like this Friday funny Ninja Bento. Now who says meatfree food is boring? :D

Thursday, September 22, 2011

Tutorial Thursday - remove apple seeds with cookie cutters

Its Tutorial Thursday again! Today's tutorial is on how to remove apple seeds with cookie cutters and/or vegetable cutters. Here is a quick and simple way of coring those apples while entertaining yourself (and of course the bento receiver). All you need is an apple, a knife and a small cookie cutter or vegetable cutter.

Apple rings as a bento space filler - see more examples towards the end of post


Here is how I made the apple rings:


Apple rings and cookie cutter tutorial - Step 1
Step 1 - Slice the apple as shown in the picture above. I sliced the apple into slices about 1 cm thickness. You can also sliced them paper thin for a different effect :)


Apple rings and cookie cutter tutorial - Step 2
Step 2 - Take a small cookie cutter or vegetable cutter. The ones I used here are about 2-3 cm in diameter. Shove it right into the centre of the apple, where the seeds are.

Apple rings and cookie cutter tutorial - My favourite photo
I like this photo a lot, it reminds me of my design school days for some strange reason. Ops, sorry I digressed, hahaha, got lost in my thoughts. This is where I place the cutter.

Step 3 - Push the vegetable or cookie cutter hard and VIOLA! You have just de-cored an apple and got a pretty shape, without actually doing anything much :D

Here are the results of my experiment with various vegetable cutter shapes.

Using a vegetable cutter on apple slices - Part 1
Using a vegetable cutter on apple slices - Part 2

Here's another way you can use these apple rings as a bento space filler
Apple rings cut with vegetable cutter or cookie cutter - Bento Space Filler
I hope you like this Tutorial Thursday post! It's a quick and easy way to remove seeds from apple  slices without too much effort because your trusty cookie cutters and vegetable cutters had done the work for you :D 

Thursday, September 15, 2011

Tutorial - Bento space filler - cucumber flower

Due to popular requests, I have decided to do a tutorial today on how I made the cucumber flowers which was feature in previous bento posts. It is much simpler than it actually looks and its also a fantastic space filler for bento boxes.

Bento Space Filler Cucumber Flower - shown here in a Ojue Lunchbox compartment


Here is a series of simple step-by-step instructions:
Slice the cucumber as thinly and evenly as possible

Cucumber slices - I cut about 15 slices in total

For illustration purposes I have sliced the cucumber into little discs which are slightly less than 2mm. If you like you can try slicing them into paper thin slices for a more delicate look.

Sprinkle salt on the cucumber slices
Place the cucumber slices in a bowl. Sprinkle some salt onto the cucumber slices and mix thoroughly. Squeeze out the excess liquid and rinse away the salt crystals under running water.

Cucumber slices in a ice water bath
Prepare some ice water and place the cucumber slices into the icy water.


Line the cucumber slices up like this

Lightly pat dry the cucumber slices with a paper towel. Line the cucumber slices up as shown in the picture above, making sure that the slices overlap each other.

Here comes the magical part - roll the cucumber slices towards yourself

Starting from the furthest end, roll the cucumber slices towards yourself. It might be a little slippery, so using both hands might be helpful. (I had to struggle here a little because my right hand was holding the camera...^^,")

Soon you will end up with something like this

Soon you will end up with something like this. If there is a lot of liquid, gently squeeze out the excess liquid as shown below:
Squeeze! *gently please*

If you are planning to use the cucumber flowers immediately as a single space filler for the bento box, you may omit the steps below.

Push uncooked spagetti into the cucumber flower

Take a piece of uncooked spagetti and push it throught the cucumber flower until you can feel that it's pushing through to the other end. Break off excess spagetti. Repeat the step, taking note of the order of the arrows.


Voila! Cucumber flower bento space filler
This is how it looks like. This cucumber flower bento can also be prepared in advance and placed in the fridge. Usually I will make 3-4 cucumber flowers at the same time and store them in an airtight container in the fridge. Usually they can last for a couple of days and they are fantastic especially when I need to pack a bento fast. Hope you like this cucumber flower tutorial! :)

About Bento Cat

My photo
Amsterdam, Netherlands
I'm Shanna and I enjoy bento making a lot. I'm also a wife, daughter,sister,a full-time student, previous fashion and product designer, nerd and super foodie all rolled into one. With Adventures of Bento Cat, I hope to document the daily happenings of my life through Bentos filled with Tender Loving Care and more! I can be contacted at bentokato@gmail.com
Related Posts Plugin for WordPress, Blogger...
Creative Commons License
Blog by Shanna at Bentocat.blogspot.com is licensed under a Creative Commons Attribution-NonCommercial-NoDerivs 3.0 Unported License.