Showing posts with label vegetables. Show all posts

Monday, October 24, 2011

Tutorial Sweet Simmered Shiitake Bento Timesaver

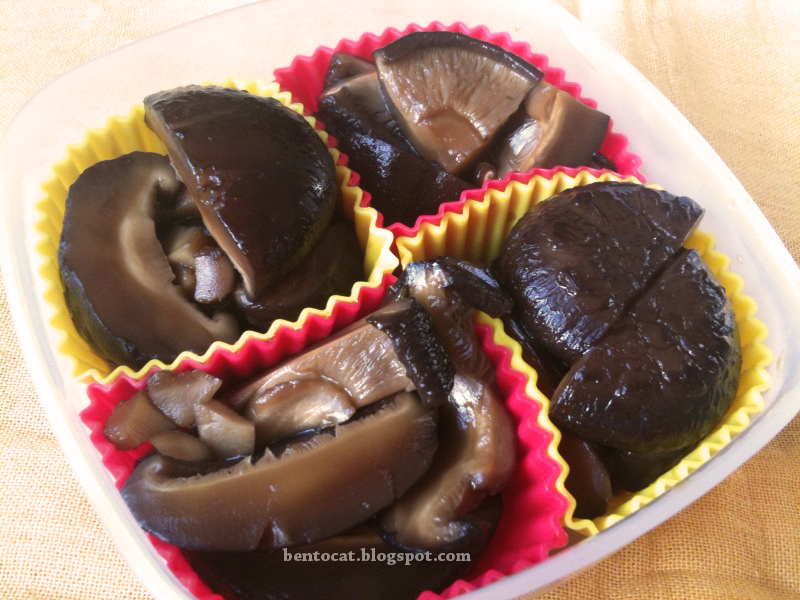
Today's tutorial post is about another trick I have up my sleeve, sweet and simmered shiitake mushrooms, which is essentially a bento timesaver recipe. This is a perfect recipe if you know that you will be busy for the rest of the week and have no time to prepare every item individually in mornings. If stored well in the refridgerator, this sweet and simmered shiitake mushroom bento timesaver should last up to a week.

Sweet and Simmered Shiitake - Bento Time Saver and Space Filler


Ingredients:
10 dried shiitake mushrooms
3 tablespoons soy sauce
2 tablespoons sugar
2 tablespoons mirin (dry sherry can be used as a substitute)
How to:
1. Soak the dried shiitake in cold water until soft. This takes about 1 hour. 

Tip: Usually I'll soak the mushrooms while I'm preparing dinner. By the time Mr Bear and I have finished eating dinner and finished all the cleaning up, it will all be soft enough. If you like, you can soak the mushrooms overnight as well.

How I soak dried mushrooms

Tip: This picture shows how I soak the mushrooms. Because the dried shiitake mushrooms tend to float (which I find rather annoying), I used a dipping dish as a weight so that all mushrooms will get soaked evenly. 

Do not discard the water which you used to soak the mushrooms.

Once the shiitake mushrooms are soft, remove the stems and cut them into bite size pieces.

Tip: As shown in the very first photo, I have cut them into different shapes. This is a personal preference because I figured that if this sweet and swimmered shiitake timesaver is going to appear on me and Mr Bear's bento for the next 2 days, it might be more interesting if they don't look the same everytime we open up the bento.

2. Put the shiitake in a pot with enough soaking water. Bring to a boil, then reduce heat and add all the other ingredients. Continue simmering until the liquid is almost absorbed completely.

Let it cool completely and portion it into little containers or small silicon cake molds. Store in the refridgerator.

This shiitake bento timesaver might taste a little sweet on it's own because it is designed as a side dish to go with rice. If you like you can serve it together with a plain salad as well.

This is how I make the Sweet and Simmered Shiitake Bento Timesaver, I hope you find the recipe and tips helpful too.

Thursday, October 13, 2011

Tutorial Thursday Bento Uncle Samosa

Yesterday Mr Bear and I had an Indian home delivery for dinner. The portions were surprisingly big and there was quite a lot of left overs. There was a big samosa that we couldn't finish and so I decided to make a tutorial on how I bento-fy (is there even such a word?) something as challenging as a irregularly shaped Samosa.

Bento Uncle Samosa

Because the samosa does not really have a smooth surface and I was feeling lazy, I decided to put the decorations on the OUTSIDE instead of directly on the samosa.

What I did was to just wrap the samosa in saran wrap (aka glad wrap, food wrap). Next I fill up the rest of the space with cucumber and tomato. I didn't use any dividers in this bento because the saran wrap would already prevent the samosa from coming in direct contact with the cucumber and tomato. As a final touch I just use a marker to draw in the eyes on contruction paper and stick it on. Uncle Samosa's moustache is made from a brown piece of contruction paper, so I didn't have to do any colouring myself. hehe.

If there is stickers lying around in the house, it will be even easier. You just have to draw in the eyes and stick it on the saran wrap.

Hope you like this easy time-saving tutorial and have a good laugh at silly Uncle Samosa!

Tuesday, October 11, 2011

Tutorial Bento Time Saver Carrot Kinpira Meatfree

Today I will share with you how I make a bento space filler that also happens to be a bento time saver, my own Carrot Kinpira. Many people have asked me recently, how on earth do you find time to make all these bentos. Well, let's say that making bentos does take a bit of effort. BUT sometimes I do get lazy, that's why I have to devise ways and means to make things more efficient. hehehe!

Kinpira 金平 きんぴら is a japanese style of cooking that can be roughly translated as "sauté and simmer". This technique can be used with many different types of root vegetable, such as carrot, burdock and lotus root. Sometimes the kinpira technique is also used on other foods such as tofu, wheat gluten and also meats like chicken, pork and beef. So in a way, I guess you can also call it Japanese stir-fry.


Carrot Kinpira Bento Time saver and Bento Filler
Ingredients
Half a carrot (julienne into strips about the size of matchsticks)
1 tablespoon Sugar
1 tablespoon Mirin
1 tablespoon Soy sauce
1 teaspoon of sesame oil
Dash of ketchup (you'll be surprise what this can do)
Sesame seed (optional)


Here's what I usually do


Carrot Kinpira - Julienne carrot


Carrot Kinpira - heat the sesame oil


Heat the sesame oil in a frying pan for less than 1 minute over moderate fire. Take care that the temperature does not get too hot, else the sesame oil will burn a little and it will taste bitter.


Carrot Kinpira - Quick saute and simmer


Add in the carrot strips and quickly toss it around a few times to make sure that they get evenly coated with the sesame oil.

Add in the sugar and give it a quick toss. If you like you can wait a little for the sugar and the sugar to caramalize a little.

Next add in the mirin and toss. At this stage, I will also add in a dash of ketchup. You will be surprised that an American invention such as the ketchup has made its way to a normal japanese kitchen (think omurice and spagetti Napolitan). The reason why I like to use a bit of ketchup here is that the tartness (sour-ness) of the vinegar and the tomato puree in the ketchup actually gives another dimension to the otherwise just sweet taste of the dish and it makes the carrot look good too!

Finally, I add in the soy sauce. I always add soy sauce the last because overcooking soy sauce changes the chemical content and also the taste of the soy sauce. Give it a quick stir and sprinkle a few sesame seeds and you are done!

This carrot kinpira recipe gives me about 4 side portions. I portion them out and place them all in a couple of silicon cake molds. This can be stored in the refridgerator for a few days and it means that everytime I want to make a bento with it, I can just take whatever I need and place it in the bento immediately. This is also great on the days when I run out of bento ideas and makes a great bento space filler too. I hope you like this bento time saver tutorial the meatfree Carrot Kinpira.


Tuesday, October 4, 2011

Bento Easy Roll-up Sandwich

After a few days of making rice-based bentos, I have decided to make a sandwich bento for a change. This is an roll-up sandwich bento is an easy one and is great for busy mornings.


For this bento, I used the usual square white bread easily available in the supermarket. Because the bread I have is slightly dry, I placed it in the microwave for about 10 seconds so that it gets softer and is easier to roll. Next I remove the crust and put in whatever filling I have on hand. It happened to be cheese and salami today, but jam and butter works well too :D Next I roll it up and secure it with a food pick.

I place the sandwich rolls in the bento box and stuff in some left over salad. (This salad was sold already cut in the supermarket near my place, so I didn't have to do anything) Add in the star and its done. I hope you like this easy roll-up sandwich bento!

Thursday, September 15, 2011

Tutorial - Bento space filler - cucumber flower

Due to popular requests, I have decided to do a tutorial today on how I made the cucumber flowers which was feature in previous bento posts. It is much simpler than it actually looks and its also a fantastic space filler for bento boxes.

Bento Space Filler Cucumber Flower - shown here in a Ojue Lunchbox compartment


Here is a series of simple step-by-step instructions:
Slice the cucumber as thinly and evenly as possible

Cucumber slices - I cut about 15 slices in total

For illustration purposes I have sliced the cucumber into little discs which are slightly less than 2mm. If you like you can try slicing them into paper thin slices for a more delicate look.

Sprinkle salt on the cucumber slices
Place the cucumber slices in a bowl. Sprinkle some salt onto the cucumber slices and mix thoroughly. Squeeze out the excess liquid and rinse away the salt crystals under running water.

Cucumber slices in a ice water bath
Prepare some ice water and place the cucumber slices into the icy water.


Line the cucumber slices up like this

Lightly pat dry the cucumber slices with a paper towel. Line the cucumber slices up as shown in the picture above, making sure that the slices overlap each other.

Here comes the magical part - roll the cucumber slices towards yourself

Starting from the furthest end, roll the cucumber slices towards yourself. It might be a little slippery, so using both hands might be helpful. (I had to struggle here a little because my right hand was holding the camera...^^,")

Soon you will end up with something like this

Soon you will end up with something like this. If there is a lot of liquid, gently squeeze out the excess liquid as shown below:
Squeeze! *gently please*

If you are planning to use the cucumber flowers immediately as a single space filler for the bento box, you may omit the steps below.

Push uncooked spagetti into the cucumber flower

Take a piece of uncooked spagetti and push it throught the cucumber flower until you can feel that it's pushing through to the other end. Break off excess spagetti. Repeat the step, taking note of the order of the arrows.


Voila! Cucumber flower bento space filler
This is how it looks like. This cucumber flower bento can also be prepared in advance and placed in the fridge. Usually I will make 3-4 cucumber flowers at the same time and store them in an airtight container in the fridge. Usually they can last for a couple of days and they are fantastic especially when I need to pack a bento fast. Hope you like this cucumber flower tutorial! :)

Monday, September 12, 2011

Bento Apple Cucumber Lettuce meat-free

Its Monday again and for many people it's either another back-to-work or back-to-school day. After a weekend of eating a lot (of junk), I thought maybe making a healthy meat-free bento is a good idea, just to kind of detox a bit. This is what I have for lunch today: Bento Apple, Cucumber and Lettuce


Hope you like this Meat Free Monday bento!

Wednesday, September 7, 2011

Bento Healthy Grapefruit Bunnies Salad

After binge-eating with Mr Bear last night, I woke up feeling like I had a food hangover. So I decided to go super healthy with this salad bento : Grapefruit Bunny Bento with lettuce. Detox!

First I put a few layers of lettuce and then the grapefruit. Not only does the lettuce looks pretty with the grapefruit, I've discovered by chance that the lettuce have an extra function. The lettuce layers "lift" the juicy bits of the grapefruit and I got to enjoy the texture of the grapefruit without them swimming in the juice. So I get to eat the grapefruit, then the lettuce and finally slurp up all the remaining juice that had collected at the bottom. What a nice discovery!

Healthy Meat-free bento featuring Grapefruit Bunnies

Close up of bento Grapefruit Bunnies

I used 2 large pieces of lettuce and 1 whole grapefruit. Just like the honeydew bunnies, I used the seed as eyes for the Grapefruit Bunnies. The bento box I used here is a 200ml air tight box I bought from Hema. Hope you like this healthy meat-free bento salad : Bento Grapefruit Bunnies :D

Monday, September 5, 2011

Lego Bento Sandwich Star and Salad

This is another quick Sandwich Bento. Its also simple and fast, just like this bento I made previously. This time I rolled up the sandwich instead of cutting them into halves. I like rolling up sandwiches because it doesn't require that much precision cutting. Perfect for a I-don't-feel-like-going-to-work Monday!
Bento Star Sandwich with Teriyaki Beef Salad and Strawberries

Close up: Bento Star Sandwich with Teriyaki Beef Salad and Strawberries

From the close up, you can see that I place the salami star on the bread and rolled everything up. I also managed to put in 2 little containers for the vegetables and beef teriyaki. Next I filled up all remaining space with strawberries so that nothing moves while the bento is being transported.

The Bento Box I used here is produced under the license of the LEGO Group. Its food safe and dishwasher safe and can tolerate temperatures from -20 degree celsius to 100 degree celsius. Although it doesn't state what the capacity is, it's quite big for a bento box. It measures about 19.5cm x 9.5cm x 5.5cm. The only disadvantage is that it is not microwave safe, so do take note. Other than that, this Lego Bento Box is one of my favourite bento boxes. I bought this in a shop in Amsterdam but it is also available online here .

Saturday, August 27, 2011

Takeout Bento Meal: Suriname Duck Curry with Roti

This is what I had for dinner after what happened to my glass stove. Now that I can't and do not dare not use the stove anymore, I'm left with 2 choices for meals. Either to buy microwave meals or buy takeout meals.

This is what Mr Bear bought for me:
Suriname Duck Curry
Suriname Roti - Pardon the sloppy picture, it was too delicious. I have already eaten half of it before I thought of taking a picture.

Mr Bear bought this from our regular Surinaamse takeout place in Amsterdam called Llalla Rookh. The duck curry stew (aka Doksa on the menu) comes with potatoes, a specific type of long green vegetable, an egg and also the Roti, which is a type of filled flat pastry-like bread. It's spicy and I really love it! And that gravy... It was heavenly, especially when dipped with the Roti. Maybe having that crazy stove isn't so bad after all :)

Saturday, August 13, 2011

Spicy Garam Masala Powder - Cook a pot of Curry Day 21 August 2011

Garam Masala Powder for Vegetarian Dishes
This spicemix requires slightly more ingredients than my previous post, and is recommended for Vegetarian Dishes. Oh yes, and if you happened to be preparing for the coming Cook a pot of Curry Day on the 21st of August, and you are trying to make a point, this is the process of curry cooking that gives out the smells :D Enjoy Roasting!

*Sidenote: If you are puzzled by all these curry posts, do check out "Singaporean Story about Curry" on what I think about the whole Curry Feud.

1-2 star anise

6 black cardamoms

2 1/2 tsp black peppercorn

10 inch worth of cinnamon sticks

1tbsp cloves

8 green cardamom

1gram mace powder (aka javitri)

4 tbsp coriander seeds

3 tbsp cumin seeds

1/2 tsp nutmeg (grated)

1/2 tsp salt

Heat the saucepan on high heat. Do not add any oil or water. When the saucepan gets hot, put in all the ingredients above. Stir constantly for about 5-8 minutes or until you can smell the fragance. Remove  from heat and wait for it to cool. Grind it up into powder form and use it immediately. Or simply store the powder in airtight containers and put it in the fridge for later use. 

Uses:
- as a marinate for meats and vegetables
- in a gravy/curry
- as a seasoning salt

Best of all, it smells sooo good and I don't have to use too much salt to make anything taste good.

Follow me on twitter: @bentokato

Star Anise

Black and Green Cardamom

Left: Black Peppercorn

Cinnamon Sticks

Thursday, August 11, 2011

Cook a pot of Curry Day 21 August 2011 - Simple Garam Masala Powder

As part of a protest which stems from Singapore, (which you can read about from here ) I have decided to post my favourite recipes featuring Curry spices. Over the next few days,  I'll try to put up different recipes on how to make your own Curry Spice mixes.


So here it goes:

Simple Garam Masala Powder
This spicemix is good for almost all types of meat and vegetable curry dishes.


First get hold of equal portions of the following ingredients:
-green cardamom
-black cardamom
-peppercorns  (whole black pepper or whole black/green/pink/white pepper)
-caraway seeds (which is quite similar to fennel and cumin seeds)

 Simply dry roast all ingredients together and then grind them into powder. After they are cooled, simply store them in air-tight containers till you need the Garam Masala powder.

The way I see this spicemix is that it's one of those multi-purpose ingredient. I use it for almost everything, from marinating meats, to making gravy out of it, to throwing it over my stir-frys. Every family has their own versions, every region has their own versions, and even different brands can taste completely different. 


And to top it all, there's even different spice mixes for different dishes (check out the right sidebar) and sometimes they go by different names as well. Sounds complicated? Nah, its not that complicated actually because there's never any hard and fast rules when it comes to cooking. What is the most important is that you or your love ones get to enjoy your cooking :) 


-------------------------------------------------------------------------------------------------------------------------

I've included some pictures, since these ingredients might be named differently in different countries.
Green and Black Cardamom

Black and White Peppercorn

Black, Green, Pink, White Peppercorn

Caraway seeds (aka Meridian Fennel or Persian Cumin)

Follow me on Twitter! @bentokato


About Bento Cat

My photo
Amsterdam, Netherlands
I'm Shanna and I enjoy bento making a lot. I'm also a wife, daughter,sister,a full-time student, previous fashion and product designer, nerd and super foodie all rolled into one. With Adventures of Bento Cat, I hope to document the daily happenings of my life through Bentos filled with Tender Loving Care and more! I can be contacted at bentokato@gmail.com
Related Posts Plugin for WordPress, Blogger...
Creative Commons License
Blog by Shanna at Bentocat.blogspot.com is licensed under a Creative Commons Attribution-NonCommercial-NoDerivs 3.0 Unported License.