Tuesday, October 25, 2011

Tutorial Cheese Crackers Real or Fake ?

Today's tutorial is a funny one, are these cheese crackers real or fake? This is an easy tutorial which we can use as a bento space filler, or as a funny prank, or as a party snack or even something less scary for Halloween. I think the possibilities are endless and this is going to taste great with breads, sandwiches, chips, salads, etc :D

Here's what you need:
2 slices of cheddar cheese
1 slice of goat cheese (or young cheese, or any cheese that is lighter than the 2 slices of cheddar you have)
1 circular cookie cutter with scallop edge (you can also use flower shaped cookie cutters)


Here's what I did:
1. Stack the cheese slices on top of one another in this manner:
cheddar cheese - goat cheese - cheddar cheese

2. Use the cookie cutter to make the shapes. Then use a toothpick (or the end of a food pick) and poke 9 holes in the centre. Voila!!

Bento Filler: Cheese Crackers Real or Fake ?

This is also a fun and easy project to work with kids because its relatively easy and mess-free for the adults and its also easy enough for kids to grasp the instructions. So now the question is, how would you name this bento tutorial, Fake Cheese Crackers or Real Cheese Crackers? ;D

Monday, October 24, 2011

Tutorial Sweet Simmered Shiitake Bento Timesaver

Today's tutorial post is about another trick I have up my sleeve, sweet and simmered shiitake mushrooms, which is essentially a bento timesaver recipe. This is a perfect recipe if you know that you will be busy for the rest of the week and have no time to prepare every item individually in mornings. If stored well in the refridgerator, this sweet and simmered shiitake mushroom bento timesaver should last up to a week.

Sweet and Simmered Shiitake - Bento Time Saver and Space Filler


Ingredients:
10 dried shiitake mushrooms
3 tablespoons soy sauce
2 tablespoons sugar
2 tablespoons mirin (dry sherry can be used as a substitute)

How to:
1. Soak the dried shiitake in cold water until soft. This takes about 1 hour. 

Tip: Usually I'll soak the mushrooms while I'm preparing dinner. By the time Mr Bear and I have finished eating dinner and finished all the cleaning up, it will all be soft enough. If you like, you can soak the mushrooms overnight as well.

How I soak dried mushrooms

Tip: This picture shows how I soak the mushrooms. Because the dried shiitake mushrooms tend to float (which I find rather annoying), I used a dipping dish as a weight so that all mushrooms will get soaked evenly. 

Do not discard the water which you used to soak the mushrooms.

Once the shiitake mushrooms are soft, remove the stems and cut them into bite size pieces.

Tip: As shown in the very first photo, I have cut them into different shapes. This is a personal preference because I figured that if this sweet and swimmered shiitake timesaver is going to appear on me and Mr Bear's bento for the next 2 days, it might be more interesting if they don't look the same everytime we open up the bento.

2. Put the shiitake in a pot with enough soaking water. Bring to a boil, then reduce heat and add all the other ingredients. Continue simmering until the liquid is almost absorbed completely.

Let it cool completely and portion it into little containers or small silicon cake molds. Store in the refridgerator.

This shiitake bento timesaver might taste a little sweet on it's own because it is designed as a side dish to go with rice. If you like you can serve it together with a plain salad as well.

This is how I make the Sweet and Simmered Shiitake Bento Timesaver, I hope you find the recipe and tips helpful too.

Saturday, October 22, 2011

Bento Burrito with Usagi Food Picks

Today's bento post features burrito and some of my favourite bento accessories, the Usagi Food Picks. This bento was made a few days back when I still have some of the carrot kinpira bento time saver left. As for the 4 mini burrito, it was made from 1 large burrito sheet cut into quarters and then rolled up individually to fit the bento box. I have included the usagi food picks (usagi means rabbit in japanese) so that I don't have to pack extra utensils for the carrot and cucumber. This means less washing up to do ^^," I hope you like this burrito bento too!

Bento Burrito with Usagi Picks

Friday, October 21, 2011

News my bentos got published in Dutch magazine

Some of you might have known that I got interviewed for a Dutch magazine some time back. Today I walked past a newsstand and saw that the article has been finally published! This article can be found in a pretty interesting Dutch magazine called Jansen, Oktober/November 2011 issue. There was an article written about the whole bento subculture travelling from Japan to the United States and Netherlands and all over the world. Bentocat was featured extensively in the article together with another Dutch bento enthusiast Leukelunch. Today is indeed a lucky Friday for me :)


Wednesday, October 19, 2011

Tutorial Bento Miffy Sandwich Free Pattern download

Due to popular request on how I made the Miffy sandwich bento (or some say Nijntje Boterham), I have decided to post a step-by-step tutorial here.


First I drew out the shape of Miffy / Nijntje on a piece of paper and then I cut it around the edges with a pair of scissors. Next I place it on a slice of goat cheese as shown in the picture below.
Tutorial Bento Miffy Sandwich


Using a sharp knife (or a toothpick), I go around the outside edge of the Miffy cutout just like the picture below. It looks a little weird at this stage, but don't worry. It's just the outline.
Miffy twins ?


I went back to the paper cutout and I cut away the pieces just like so:


Next I sliced a piece of carrot and fitted Miffy's clothes on it. Now I use my sharp knife to cut out the shape of Miffy's orange dress.


Here is how my Miffy Sandwich / Nijntje Boterham Bento looks like:

Since I ran out of seaweed, I have used black Supercook Writing Icing (which I managed to find in a bakery supplies store) for Miffy's eyes and mouth. Because it is used only in a small quantity, it doesn't taste obviously sweet.

I have drawn up a copy of the Miffy character I made for this bento here so that you can make this Miffy Sandwich bento too. Simply print this out on a regular A4 size paper and you can use it as a template. I hope you like this tutorial and please feel free to come back often for more goodies :)

Friday, October 14, 2011

Bento Miffy Sandwich Nijntje Boterham

Today's bento features Nijntje, also known as Miffy internationally, which is one of my favourite characters when I was growing up. When I was young, I remember my mom reading the books to me. Sometimes we would go to the library and I would pick out the books by the basket, literally begging her to bring all of them home. hahaha!
Many people might not know, but this little rabbit has Dutch origins and goes by her Dutch name Nijntje. Her creator Dick Bruna created this character in 1955 after telling his grandson stories about a little rabbit they had seen in the woods in Utrecht. Nijntje (pronounced roughly as "NAI-n-je" in the English way) was the typical child's pronunciation for Konijntje which means little rabbit in Dutch.

Although Nijntje is drawn with barely a few lines, it is instantly recognisable as a rabbit. Soon the character Nijntje becomes an instant hit internationally. Dick design his Nijntje books with minimal dialogues (some even without dialogues) because he thinks that the illustrations should speak for themselves and also because the books were also meant for children as learner books. Nijntje's books soon got translated into many languages and exported into many countries in the world, including Japan. But there was a big problem because not many people can pronounce Nijntje's dutch name. Soon, Nijntje got another name that is easier to pronounce, MIFFY. This is why all translations of Nijntje referred to her as Miffy, or at least with a phonetic translation that sounds like Miffy.

Bento Miffy Sandwich Nijntje Boterham

Many think that Miffy is Japanese, because Sanrio's Hello Kitty and friends are drawn using a similar line style. In addition, the Miffy brand is popular in Japan and there is a lot of Japanese-made Miffy merchandise. To complicate things a little more, Hello Kitty found a friend called Cathy in 1976. Just like Miffy, Cathy is also a rabbit who doesn't talk much and is drawned in a similar fashion. Of course Dick Bruna wasn't very happy about it and there was a long love/hate relationship between the company that owns Miffy, namely Mercis BV and Sanrio. On November 2, 2010, a Dutch court ruled against Sanrio and ordered the company to stop marketing Cathy products in Belgium, Luxembourg, and the Netherlands. Sanrio raised an appeal soon after.

Following the 2011 March 11 earthquake and tsunami in Japan, Sanrio and Mercis BV settled the lawsuit out of court under the condition that Sanrio must stop worldwide production of merchandise that feature Cathy. Instead of continuing the court battle like most big companies are likely to do, the two companies will donate the legal fees to help the earthquake victims, which I thought was rather sweet of both of them.

Ok, I think this post is getting rather long. Sorry I got carried away, hahaha, because I really love Nijntje / Miffy a lot and she reminds me a lot of my childhood. I hope you like this Miffy Sandwich Bento or should I say Nijntje Boterham Bento as much as I do :)


Thursday, October 13, 2011

Tutorial Thursday Bento Uncle Samosa

Yesterday Mr Bear and I had an Indian home delivery for dinner. The portions were surprisingly big and there was quite a lot of left overs. There was a big samosa that we couldn't finish and so I decided to make a tutorial on how I bento-fy (is there even such a word?) something as challenging as a irregularly shaped Samosa.

Bento Uncle Samosa

Because the samosa does not really have a smooth surface and I was feeling lazy, I decided to put the decorations on the OUTSIDE instead of directly on the samosa.

What I did was to just wrap the samosa in saran wrap (aka glad wrap, food wrap). Next I fill up the rest of the space with cucumber and tomato. I didn't use any dividers in this bento because the saran wrap would already prevent the samosa from coming in direct contact with the cucumber and tomato. As a final touch I just use a marker to draw in the eyes on contruction paper and stick it on. Uncle Samosa's moustache is made from a brown piece of contruction paper, so I didn't have to do any colouring myself. hehe.

If there is stickers lying around in the house, it will be even easier. You just have to draw in the eyes and stick it on the saran wrap.

Hope you like this easy time-saving tutorial and have a good laugh at silly Uncle Samosa!

Tuesday, October 11, 2011

Tutorial Bento Time Saver Carrot Kinpira Meatfree

Today I will share with you how I make a bento space filler that also happens to be a bento time saver, my own Carrot Kinpira. Many people have asked me recently, how on earth do you find time to make all these bentos. Well, let's say that making bentos does take a bit of effort. BUT sometimes I do get lazy, that's why I have to devise ways and means to make things more efficient. hehehe!

Kinpira 金平 きんぴら is a japanese style of cooking that can be roughly translated as "sauté and simmer". This technique can be used with many different types of root vegetable, such as carrot, burdock and lotus root. Sometimes the kinpira technique is also used on other foods such as tofu, wheat gluten and also meats like chicken, pork and beef. So in a way, I guess you can also call it Japanese stir-fry.


Carrot Kinpira Bento Time saver and Bento Filler
Ingredients
Half a carrot (julienne into strips about the size of matchsticks)
1 tablespoon Sugar
1 tablespoon Mirin
1 tablespoon Soy sauce
1 teaspoon of sesame oil
Dash of ketchup (you'll be surprise what this can do)
Sesame seed (optional)


Here's what I usually do


Carrot Kinpira - Julienne carrot


Carrot Kinpira - heat the sesame oil


Heat the sesame oil in a frying pan for less than 1 minute over moderate fire. Take care that the temperature does not get too hot, else the sesame oil will burn a little and it will taste bitter.


Carrot Kinpira - Quick saute and simmer


Add in the carrot strips and quickly toss it around a few times to make sure that they get evenly coated with the sesame oil.

Add in the sugar and give it a quick toss. If you like you can wait a little for the sugar and the sugar to caramalize a little.

Next add in the mirin and toss. At this stage, I will also add in a dash of ketchup. You will be surprised that an American invention such as the ketchup has made its way to a normal japanese kitchen (think omurice and spagetti Napolitan). The reason why I like to use a bit of ketchup here is that the tartness (sour-ness) of the vinegar and the tomato puree in the ketchup actually gives another dimension to the otherwise just sweet taste of the dish and it makes the carrot look good too!

Finally, I add in the soy sauce. I always add soy sauce the last because overcooking soy sauce changes the chemical content and also the taste of the soy sauce. Give it a quick stir and sprinkle a few sesame seeds and you are done!

This carrot kinpira recipe gives me about 4 side portions. I portion them out and place them all in a couple of silicon cake molds. This can be stored in the refridgerator for a few days and it means that everytime I want to make a bento with it, I can just take whatever I need and place it in the bento immediately. This is also great on the days when I run out of bento ideas and makes a great bento space filler too. I hope you like this bento time saver tutorial the meatfree Carrot Kinpira.


Award: Heart Locket Award

Although fall is coming (or should I say, it's already here ^^,) and the sky is slightly grey, it's been a very nice day today.  I woke up later than usual, switched on my computer  like usual (don't we all do that in mornings nowadays? hehehe) and to my surprise I found that one of my blogger friends gave me a Heart Locket Award, which I think is so sweet of her. She is Tata from Bonitofood.
 
Thank you so much Tata for being so nice and sweet, you really make my day :D


These are some rules for the award receiver:
1. If you get this award, pass it on to other 7 blogs
2. Put in the award picture in your post
3. Don't pass the award back to the award giver
4. Answer the questions below and post them in your blog

Only 2 questions, it's good to know you better :D
1. What makes you feel great about yourself?
2. Who inspires you most? Also be more specific, which qualities inspire you, in each person? You can list as many people you like.

My answers:
1. Bento making really make me feel great about myself. I've been asked before, why bother to go through so much trouble, when the food is going to be eaten up in 3 seconds anyway. This is really a good question though. The thing about me is my gratification doesn't actually come from the bento receiver slowly savouring the food. On the contrary, it comes from me knowing that my bento has cheered someone up from a boring/busy workday and the rest are totally not important for me. haha, I guess in a twisted sense, its the fascination (that my bentos make other people happy) that makes me feel great about myself. hehe

2. Well, I guess it has to be my husband Mr Bear. Usually I don't go all mushy about us and such, but I think he really deserves a mention. I think he is the most intelligent and sensitive guy I have ever met. I used to be a die-hard feminist and never really believed much in stuff like cooking for my man. When I got to know Mr Bear, everything changed, my world changed, the way I view the world changed as well. He was the one who gave me the strength and encouragement to really do what I like without being judgemental. Thank you for being you Mr Bear.

Now let me pass this award to 7 lucky beautiful blogs:
 
5. hwsoh

Have a Happy Day!

Monday, October 10, 2011

Bento Meatless Monday grapefruit write up

Today we are having a simple meatless grapefruit salad bento for lunch. I have decided to make this meatfree fruit salad because we had eaten a lot of junk food over the weekend and I am feeling really quite guilty. hahaha! Yesterday, Mr Bear and I ordered Surinaamse take-out with a full portion of chicken curry and roti (for me), a full portion of lamb and roti (for Mr Bear) AND a full portion of Java-style Saoto soup (Soup soto) with rice! Hahaha basically it was rather big portions even for 3 big adult eaters. We sat in front of the TV and basically binge ate. hahaha, and before we knew it, we had finished EVERYTHING and the takeout boxes were all licked clean. Come to think of it, its rather unbelievable. LOL!

Sorry, I had digressed, hahaha! Other reason why I had made this meatfree bento with grapefruit is because of its high vitamin C content and its high fiber content. Pink and red varieties of the grapefruit also contain high amounts of an antioxidant called lycopene (which can also be found in tomatoes). What is also good about the grapefruit is that it can help lower cholesterol, which makes it ideal (at least psychologically, hahaha) after yesterday's food binge. There is one very important thing to take note though, if you are on medication, please check with the healthcare professional before eating a grapefruit because studies have shown that grapefruit might give certain drug interactions, often making the drug more potent than it is supposed to be.

Bento Meatless Monday Red Ruby Grapefruit Salad

Previously I have also made a Grapefruit Salad Bento, but this time round, I made a variation. Instead of laying pieces of lettuce to filter out the grapefruit juice, I cut the grapefruit into a half. Then I removed all the juicy grapefruit flesh from one half and sliced them into manageable bite-size pieces and pop them back into the grapefruit "basket". This way, all the grapefruit juices stay IN the basket and not everywhere else. For the other half, I sliced it into wedges and stack them on top of the basket. I top it up with a sleeping bunny food pick and a few small slices of the lettuce for the colour. I hope you like today's Meatfree Monday Red Ruby Grapefruit Salad.

Wednesday, October 5, 2011

Bento Inari Hairclip Bears

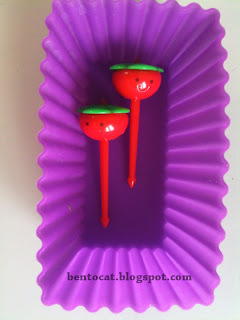
Today's bento post Inari Bears with Hairclips, is consist of Inari sushi, which is simply made of rice stuffed into tofu pouches, and some cucumber on the side. Sometimes I add cream tuna or corn into the pouch too, but this time  its plain.  I didn't take long to prepare this bento, because its just stuffing the rice into the pouches and slicing cucumbers. Later on I just stick foodpicks (which I bought recently from Bento&Co) near the corners to form ears for the bears. They also look like hairclips for the inari bears. So far this has been my favourite set of food picks because it's quite funny.

Bento Bears with hairclips which are funny looking foodpicks I ordered from Bento&Co

If you see the picture above, they looked like butterfly and clover "hairclips" but there's more to it than meets the eye. Here's how the funny foodpicks look like from the side:
Funny Bento Foodpicks 1 - sideview

Funny Bento Foodpicks 2 - sideview


Hehe, I think this picks will come in handy for cherry tomatoes, little quail eggs or grapes. Using food picks means that dirty fingers will not come in contact with the tomatoes, quail eggs or grapes and it instantly adds some colour to a bento.

Tuesday, October 4, 2011

Bento Easy Roll-up Sandwich

After a few days of making rice-based bentos, I have decided to make a sandwich bento for a change. This is an roll-up sandwich bento is an easy one and is great for busy mornings.


For this bento, I used the usual square white bread easily available in the supermarket. Because the bread I have is slightly dry, I placed it in the microwave for about 10 seconds so that it gets softer and is easier to roll. Next I remove the crust and put in whatever filling I have on hand. It happened to be cheese and salami today, but jam and butter works well too :D Next I roll it up and secure it with a food pick.

I place the sandwich rolls in the bento box and stuff in some left over salad. (This salad was sold already cut in the supermarket near my place, so I didn't have to do anything) Add in the star and its done. I hope you like this easy roll-up sandwich bento!

Monday, October 3, 2011

Bento Making Golden Rules

I was looking back at my old bentos over the weekend and felt rather happy seeing my progress. I realised that I have learnt a few lessons over the course of time. Here are some of the "Golden Rules" I have learnt.

Golden Rules of Bento Making (c)iStockphoto/Ayzek

Golden Rule #1
Always stuff your bento lunch box till it's full. 

When I say full, I really mean full, to the top edge of the box. Usually I make sure it's so full that there is no room for the ingredients in the box to move around.

I remembered the time when I thought I had made a decent bento in the morning and when I opened it for lunch, to my horror, it was a terrible mess. Apparently the contents moved everywhere because I had only filled the base of the box with items and they had moved around in that big space above them as I made my way to school.

Golden Rule #2
Make sure that food is sufficiently cooled before you place them in the box.

This is because condensation may occur and it may spoil the items in the box prematurely.


Golden Rule #3
Try to line the bento box with some kind of leafy vegetable makes cleaning up a lot easier.

Of course, this isn't compulsory, but it really does make a difference when it comes to cleaning up. And besides, the lettuce can always be eaten up so there's hardly any wastage.

Golden Rule #4
Keep salad dressings / sauce dips in a separate tiny container.

This prevents the salad turning into a soggy mess by lunchtime. When the weather is warm, I use a small cooler pack on the vegetables as well.

Golden Rule #5
Pack a small cooler pack with the bento if the weather is warm


This keeps the food fresher and prevents sad looking half melted cheese.


So far these are some of the golden rules I always store at the back of my head whenever I make bentos. More "golden rules" (or I would rather say tips and tricks) of bento making coming up soon, so do keep an eye on the site :)


Sunday, October 2, 2011

Bento Elf Babies - Inari Sushi - Meat-free

These two elf babies are essentially Inari sushis, simply tofu pouches and rice balls.
I made this Bento Elf Babies with some leftover tofu pouches from the Ninja Bento I made for Mr Bear on Friday. Even though I am carnivourous (most of the time), I really will eat meals without meat if its delicious and presented in an appealing way. I guess you can say that I am a big kid in disguise. hahaha!

Bento Elf Babies Inari sushi, shown here with 2 black Ojue compartments
Hope you like this Meat-free Inari sushi Elf Baby Bento!

Friday, September 30, 2011

Bento Ninja Friday Funny - Meatfree

Funny Friday Meatfree Bento Ninja. Its Friday again and today's bento post is about 2 funny ninjas. These 2 funny ninjas are actually inari sushis in disguise. They are made with tofu skin pouches (abura-age) and rice. Since Mr Bear also like to have inari sushi with corn, I placed some corn in a small silicon baking mold as a spacefiller for the bento. Chopped green apples are also included as a healthy dessert.


Friday Funny Bento Ninja

I hope you like this Friday funny Ninja Bento. Now who says meatfree food is boring? :D

Monday, September 26, 2011

Meatfree Monday Bento babybel cheese

It's Meatfree Monday again: Today's bento consist of mini babybel cheese, brocolli, zuchinni and a yoghurt muesli bar. I had been wanting to make this series of babybel cheese for some time now. A few months ago, I was lucky enough to go to Bangladesh for a friend's wedding. The celebrations were fabulous and I met three lovely young ladies Ishra, Yushra and Tania. Even though they are not more than 11 years old, I felt as though I had learnt a lot from them. Maybe I was too engrossed in all the stress going around in the adult world, juggling so many things at the same time and all. They say the most funny and witty stuffs and we talked about so many things! From cooking, to Roald Dahl, to our likes and dislikes, to our ambitions and even alternative ambitions!

Bento Meatfree Monday Babybel girls

 That said, maybe I should go write the young ladies another email. Hope you like today's Meatfree Monday Bento: Babybel cheese with zucchini and brocolli.

Friday, September 23, 2011

Bento Tricolour Pesto Pasta

Today's bento is a tricolour bento made with bow-tie pasta (also known as Farfalle) laced with pesto sauce. I added red capsicum and golden yellow zucchini for the extra colour and taste.

Tricolour bento with Pesto Farfalle Capsicum and Golden Zuccini
The golden yellow zucchini and the red capsicum were prepared together with the farfalle pasta and pesto sauce as one-dish. When I was packing this tricolour bento, I set aside the red capsicum and yellow zucchini so that it looks bright and colourful. Have a bright and colourful Friday too and I hope you like this tricolour pesto pasta bento!

Thursday, September 22, 2011

Tutorial Thursday - remove apple seeds with cookie cutters

Its Tutorial Thursday again! Today's tutorial is on how to remove apple seeds with cookie cutters and/or vegetable cutters. Here is a quick and simple way of coring those apples while entertaining yourself (and of course the bento receiver). All you need is an apple, a knife and a small cookie cutter or vegetable cutter.

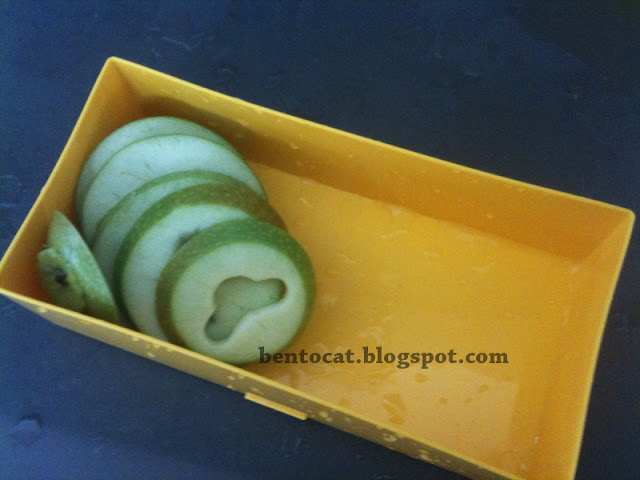
Apple rings as a bento space filler - see more examples towards the end of post


Here is how I made the apple rings:


Apple rings and cookie cutter tutorial - Step 1
Step 1 - Slice the apple as shown in the picture above. I sliced the apple into slices about 1 cm thickness. You can also sliced them paper thin for a different effect :)


Apple rings and cookie cutter tutorial - Step 2
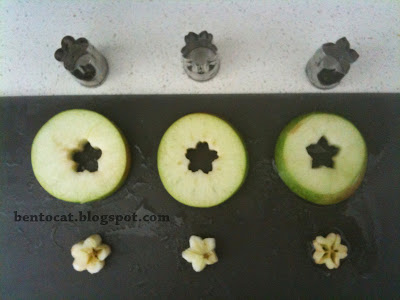
Step 2 - Take a small cookie cutter or vegetable cutter. The ones I used here are about 2-3 cm in diameter. Shove it right into the centre of the apple, where the seeds are.

Apple rings and cookie cutter tutorial - My favourite photo
I like this photo a lot, it reminds me of my design school days for some strange reason. Ops, sorry I digressed, hahaha, got lost in my thoughts. This is where I place the cutter.

Step 3 - Push the vegetable or cookie cutter hard and VIOLA! You have just de-cored an apple and got a pretty shape, without actually doing anything much :D

Here are the results of my experiment with various vegetable cutter shapes.

Using a vegetable cutter on apple slices - Part 1
Using a vegetable cutter on apple slices - Part 2

Here's another way you can use these apple rings as a bento space filler
Apple rings cut with vegetable cutter or cookie cutter - Bento Space Filler
I hope you like this Tutorial Thursday post! It's a quick and easy way to remove seeds from apple  slices without too much effort because your trusty cookie cutters and vegetable cutters had done the work for you :D 

Wednesday, September 21, 2011

Bento Leftover Fried Rice Salami Cheese Star

Today's bento post is a quick and easy one. It's largely made of leftover from dinner on the previous day, which happens to be fried rice with corn beef. After filling up the bento box, I placed the big cheese star and the little bits of lettuce. Smaller salami stars follow next and the eyes and mouth come in the last.

Bento Leftover Fried Rice with cheese and salami star

The bento box I used here is called the Ojue Bento Box, while the cheese and salami stars are made from a 6-in-1 plastic cookie cutter from Daiso. Hope you like this fried rice leftover bento with salami and cheese stars :)

Friday, September 16, 2011

Bento Funny Frog Face Fillet o Fish for a Friday

Today I'm in a pretty funny mood when I decided to make this bento. It's fish fillet burger with chopped apples on a bed of lettuce. Maybe I should give this bento a funny sounding name as well. Bento Funny Frog Face Fillet o Fish. hahaha, now I want to hear someone read this title out loud and fast :p


Hope you have a good laugh with this Bento Funny Frog Face Fillet o Fish and have a happy funny Friday! :)

Thursday, September 15, 2011

Tutorial - Bento space filler - cucumber flower

Due to popular requests, I have decided to do a tutorial today on how I made the cucumber flowers which was feature in previous bento posts. It is much simpler than it actually looks and its also a fantastic space filler for bento boxes.

Bento Space Filler Cucumber Flower - shown here in a Ojue Lunchbox compartment


Here is a series of simple step-by-step instructions:
Slice the cucumber as thinly and evenly as possible

Cucumber slices - I cut about 15 slices in total

For illustration purposes I have sliced the cucumber into little discs which are slightly less than 2mm. If you like you can try slicing them into paper thin slices for a more delicate look.

Sprinkle salt on the cucumber slices
Place the cucumber slices in a bowl. Sprinkle some salt onto the cucumber slices and mix thoroughly. Squeeze out the excess liquid and rinse away the salt crystals under running water.

Cucumber slices in a ice water bath
Prepare some ice water and place the cucumber slices into the icy water.


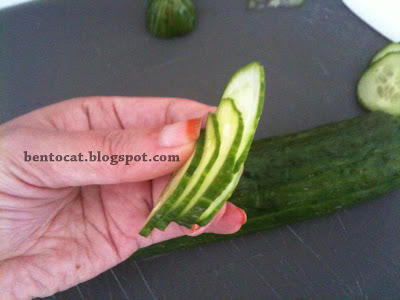
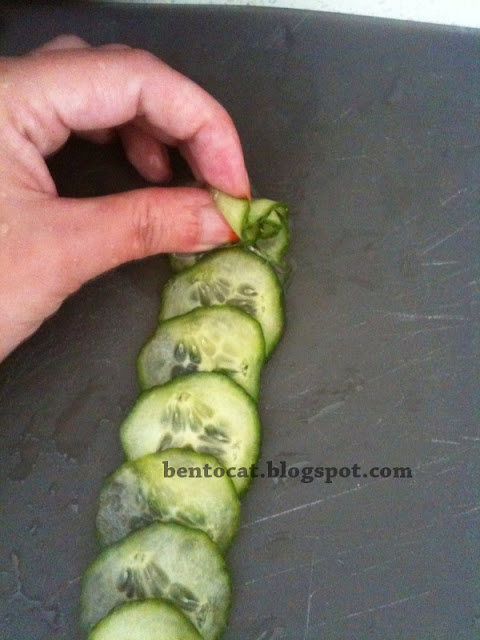
Line the cucumber slices up like this

Lightly pat dry the cucumber slices with a paper towel. Line the cucumber slices up as shown in the picture above, making sure that the slices overlap each other.

Here comes the magical part - roll the cucumber slices towards yourself

Starting from the furthest end, roll the cucumber slices towards yourself. It might be a little slippery, so using both hands might be helpful. (I had to struggle here a little because my right hand was holding the camera...^^,")

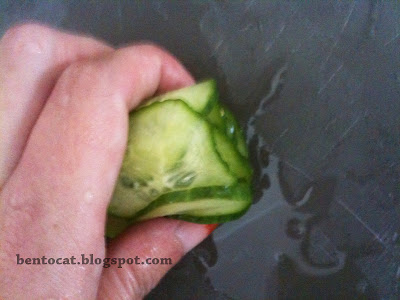
Soon you will end up with something like this

Soon you will end up with something like this. If there is a lot of liquid, gently squeeze out the excess liquid as shown below:
Squeeze! *gently please*

If you are planning to use the cucumber flowers immediately as a single space filler for the bento box, you may omit the steps below.

Push uncooked spagetti into the cucumber flower

Take a piece of uncooked spagetti and push it throught the cucumber flower until you can feel that it's pushing through to the other end. Break off excess spagetti. Repeat the step, taking note of the order of the arrows.


Voila! Cucumber flower bento space filler
This is how it looks like. This cucumber flower bento can also be prepared in advance and placed in the fridge. Usually I will make 3-4 cucumber flowers at the same time and store them in an airtight container in the fridge. Usually they can last for a couple of days and they are fantastic especially when I need to pack a bento fast. Hope you like this cucumber flower tutorial! :)

About Bento Cat

My photo
Amsterdam, Netherlands
I'm Shanna and I enjoy bento making a lot. I'm also a wife, daughter,sister,a full-time student, previous fashion and product designer, nerd and super foodie all rolled into one. With Adventures of Bento Cat, I hope to document the daily happenings of my life through Bentos filled with Tender Loving Care and more! I can be contacted at bentokato@gmail.com
Related Posts Plugin for WordPress, Blogger...
Creative Commons License
Blog by Shanna at Bentocat.blogspot.com is licensed under a Creative Commons Attribution-NonCommercial-NoDerivs 3.0 Unported License.